

How To Install A Window Frame
How to Install a Window
Two easy means to pull out old windows and put in new wood or vinyl replacement inserts or double-hung sash replacement kits.
![]() Time
Time
A total day
![]() Complication
Complication
Intermediate
![]() Toll
Toll
$101–250
Introduction
Prepare to supplant your drafty erstwhile windows with new energy-efficient units? We'll bear witness yous the two easiest ways to pull out old windows and put new ones in—and yous don't have to tear off the interior moldings or disturb exterior trim and siding to do it.
Tools Required
Materials Required
- Caulk
- Fiberglass insulation
- Minimal expanding foam
- Shims
How to Supplant Windows: Double-Hung
In this article, we'll show you pace by step how to remove the old sash from double-hung windows and mount either a new sash kit or a wood or vinyl replacement insert inside your existing window jamb. Even a beginner tin can do information technology. Read on to learn how to replace windows.
Both the sash replacement kit and the woods or vinyl replacement insert mount inside your existing window jamb, in the identify that was occupied by the sometime sash. They both fit in the space between the outside stop, chosen the blind stop, and the removable interior stop (meet Fig. A). The sash replacement kit is designed to replace the sash in double-hung windows merely. Wood or vinyl replacement inserts, on the other hand, are cocky-contained units with their ain jamb and sash, and tin can, therefore, be slid into nigh any type of window jamb. They are available as double-hung, sliding or casement-manner windows.
Either blazon of replacement window must be installed in a solid, rot-free jamb. Inspect your quondam window frame advisedly for signs of water impairment. Pay particular attention to the sill. Probe with a screwdriver to uncover subconscious soft spots. Normal exposure to rain and snow oftentimes causes the exposed parts of poorly maintained windowsills or the lower sections of the exterior trim to rot. An experienced carpenter tin normally repair these areas with sections of new wood or you lot can use an epoxy repair arrangement. Rot along the top or interior parts of windows, including the window jamb, is more difficult to repair and often signals a bigger trouble. Don't mess with repairs when installing windows. Programme on trigger-happy out the unabridged window and installing a new one.
Project pace-by-step (25)
Step 1
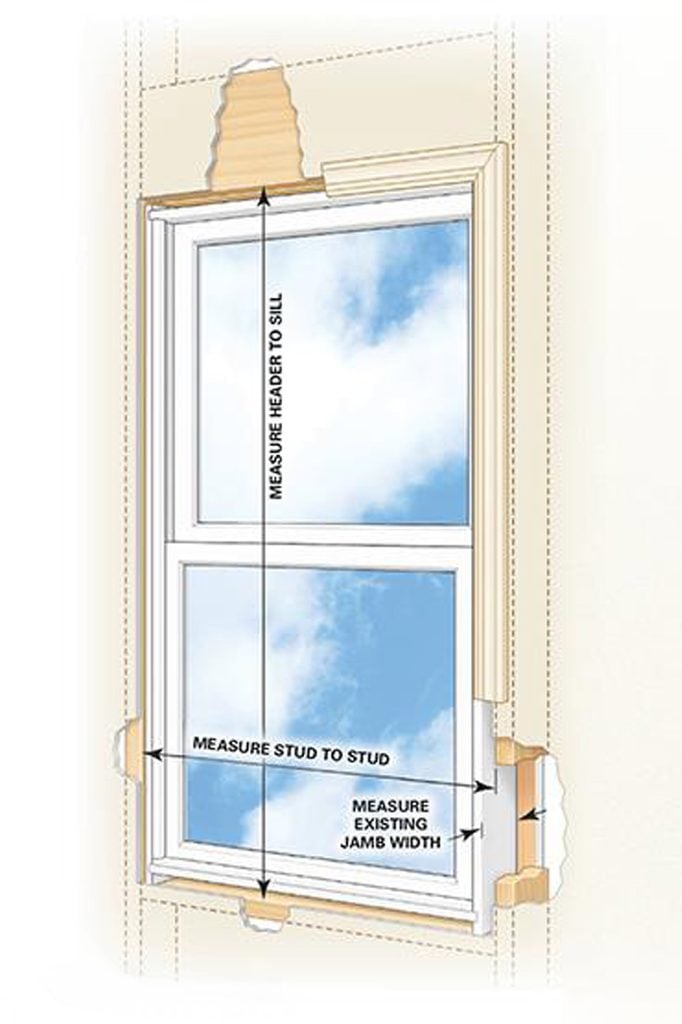
Window parts and how to replace a window frame

Figure A will aid yous to empathise the parts of a window. Measure very carefully earlier yous place an order, no thing what type you install. There's nothing worse than discovering that your non-returnable, custom-sized window doesn't fit.
If your firm was built before about 1940, y'all'll likely have double-hung windows with sash weights and cords like the ones shown in this commodity. Newer double-hung windows may have springs or jamb liners instead, but once these are removed, the replacing windows in old house process are the same.
Step two
How to Measure for Replacement Windows
Yous can replace windows in just a few hours each, but first, you have to get accurate measurements to order the new ones. It's like shooting fish in a barrel to measure the rough opening width and height once you lot remove the wood trim. Only many DIYers make the mistake of not getting a precise depth measurement. If the window frame doesn't sit down flush with the wall, you'll have to plane and sand the window frame or thicken the jamb depth with furring strips. That turns a relatively easy job into an all-24-hour interval matter. Then accept your time and use a ruler to get the correct depth.
Measure the width between the side jambs at the top, centre and bottom and record the smallest measurement. Mensurate all the style to the jamb, not the bullheaded stop or departing stop (encounter Fig. A). Now measure the height from the top jamb to the sill (see Fig. A). Measure both sides and the middle and tape the smallest measurement. Finally, determine the sill angle and specify this when yous order a sash replacement kit to make sure the jamb liners fit tight to the sill. This footstep isn't necessary for ordering wood or vinyl replacement inserts.
Your objective is to buy a window that fits within that opening. If yous don't, you'll accept to brand the opening smaller, or worse, overstate the opening to fit the new window. And that also means reworking all the exterior trim, siding and interior wall surfaces. Take all of these numbers with you when you lot go shopping, and know that you can custom-guild odd sizes if no stock sizes fit your opening.
![]()
Footstep 3
Replacement Inserts or Sash Replacement Kits?
Both the sash replacement kit and the wood or vinyl replacement insert mountain within your existing window jamb, in the place that was occupied by the onetime sash. They both fit in the space betwixt the exterior terminate, called the blind stop, and the removable interior stop (see Fig. A). The sash replacement kit is designed to supplant the sash in double-hung windows merely. Wood or vinyl replacement inserts, on the other hand, are cocky-independent units with their own jamb and sash, and can, therefore, exist slid into almost any blazon of window jamb. They are bachelor as double-hung, sliding or casement-style windows.
Pace 4
Replacement Window Insert

Option i: Wood or vinyl replacement inserts
For a maintenance-gratis window that doesn't crave any painting or staining, consider vinyl replacement windows. Replacement window inserts tilt into the existing frame and are pre-hung in a frame. Some companies even brand a simulated wood grain interior. Since wood or vinyl replacement inserts have their ain jamb, they can exist installed in window jambs that are slightly out of square. Inquire your window dealer for help measuring, though, since y'all'll take to downsize the window slightly to fit.
Shopping for replacement windows is a little trickier than buying sash kits because the quality of the windows varies dramatically and many are available only to contractors. Make sure to inspect and operate an actual working model of the window before you order. Look closely at details like the locking organisation, weatherstripping, and sash and frame joints. Then consider the overall appearance. Some windows, like ours, have narrow vinyl sash parts that allow more light and a better view than windows with wide sash frames.
Stride 5
Sash Replacement Kit
Choice 2: Double-hung sash replacement kits
If yous desire to retain the authentic wood look of your quondam double-hung windows, sash replacement kits are the best choice. Sash replacement kits have 5 parts and fit into the existing window. Y'all can order the sashes with grilles to match the balance of the windows in your house and paint or stain the wood. (You can choose grilles that either snap-in or are glued to the glass.) Merely your old window jamb must be foursquare and rot-gratis. Measure diagonally. If the diagonal measurements differ by more than 1/2 in., the new sash won't seal properly and you lot should supervene upon the window or use a vinyl replacement window instead.
Double-hung sash replacement kits consist of two new forest window sashes, ii vinyl jamb liners and installation hardware. Features similar energy-efficient low-E glass, faux divided lites and maintenance-free outside cladding are available for an actress cost. Contact the manufacturer for more information about options and to find out where to lodge windows in your area.
Stride 6
Installing Wood or Vinyl Replacement Inserts
Caution! Houses built before 1978 may comprise atomic number 82 paint. Before disturbing any surface, get a lab assay of paint chips from information technology. Contact your public health department for data on how to collect samples and where to send them. Practise-it-yourself lead testing kits are also bachelor at home centers and hardware stores.
Pace 7
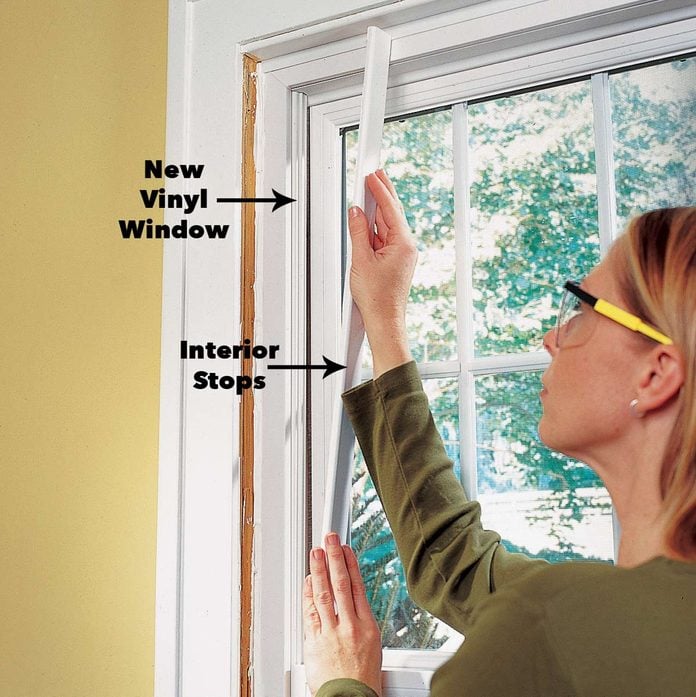
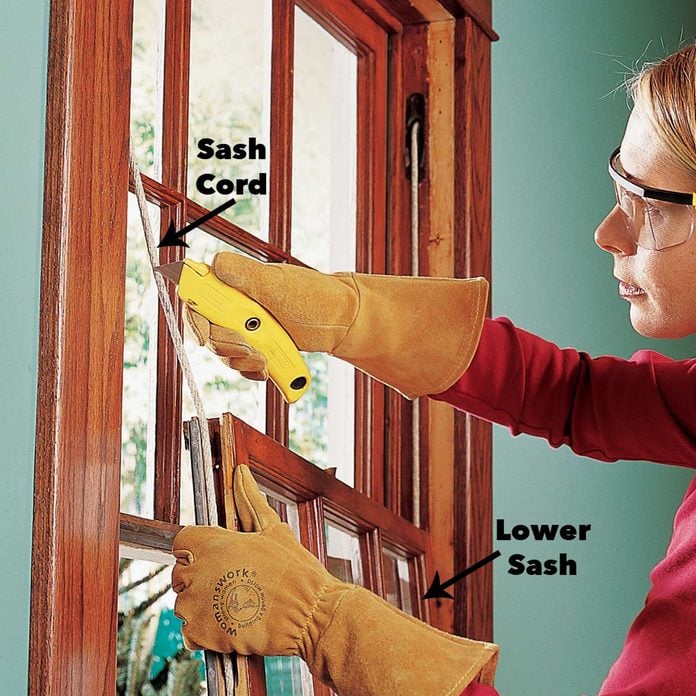
Gently Pry off the Interior Stops

Beginning your replacement insert installation past removing the interior stop, sash and parting cease. Pry confronting a stiff putty knife to protect the wood. To minimize paint chipping on painted windows, score the joint between the window frame and end with a utility knife before prying off the cease. Pull the nails through the backside of the terminate with a boom nipper or pliers.
The parting stop is usually caked with paint and difficult to remove. Use pliers to break out the lower section. If the upper sash is stuck, pry or intermission out the upper section of parting stop with a chisel. If your windows have bound balances or metal jamb liners rather than sash weights like ours, first by removing the interior stops. And so wait for the screws or nails that secure the sash hardware and remove them. The goal is to remove all hardware dorsum to the bullheaded stops.
Step viii
Test the Fit
Sideslip the new window insert into identify to make sure it fits. You don't have to worry virtually dinging upwardly the jamb and sill because they'll be covered. If your window has a sash weight cavity, stuff it with insulation. Then remove the window insert and lay a bead of polyurethane window and door caulk along the inside of the blind stop and the backside of the window stool.
Step 9
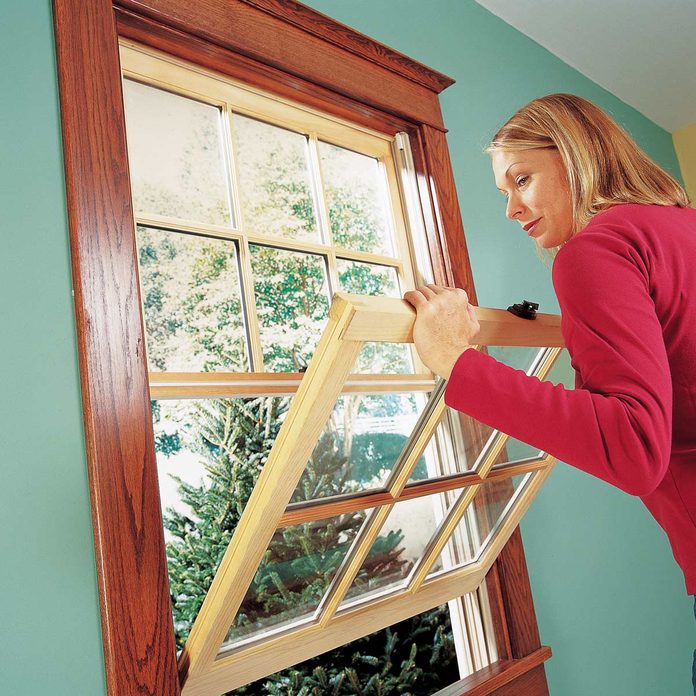
Place the Window

Balance the bottom of the replacement window on the sill and tilt the window into place against the blind stop. If your window includes a head expander, position it over the tiptop of the jamb starting time. Printing the window tight against the caulked blind stop.
Step 10
Fasten the Window

Your wood or vinyl replacement insert will exist slightly smaller than the window jamb opening to allow for shimming. The primal to a window that operates smoothly and seals properly is getting the frame perfectly square and the sides straight. Loosely fasten the window into the frame with partially driven screws in the lower left and upper right corners. Don't be agape to remove the screws and readjust the window in the opening if necessary.
Step 11
Cheque for Square

Close and lock the sash. Measure diagonally beyond the new window. Slide shims backside the screw holes in the four corners and adjust them until the diagonal measurements from opposite corners are equal. Drive screws through the upper left and lower right screw holes..
Step 12
Plumb the Window
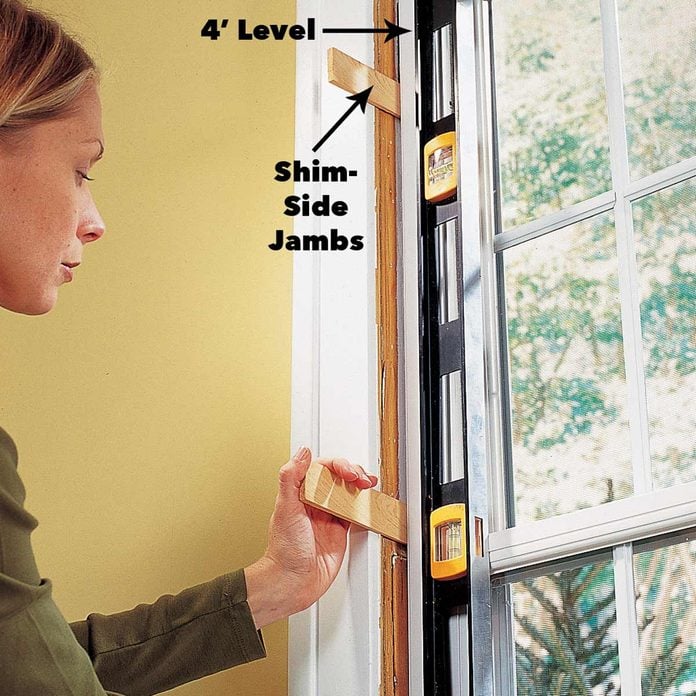
In addition to checking the window by measuring the diagonals, open up and shut the sashes to make sure the tops and bottoms are parallel with the sill and top jamb and that the summit and bottom sashes are parallel to each other where they meet in the middle. Hold a level against the side jamb and slide wood shims backside each remaining screw hole until the side jamb of the window is straight. Snug up all of the screws and check to make sure the sashes slide easily and align perfectly where they meet in the heart. Be careful; overtightening the screws could warp the vinyl jamb. Cutting off the shims with a sharp utility pocketknife.
Pace 13
Reinstall the Trim
Replace the interior stops and blast them in place with 4d finish nails.
Step 14
Insulate
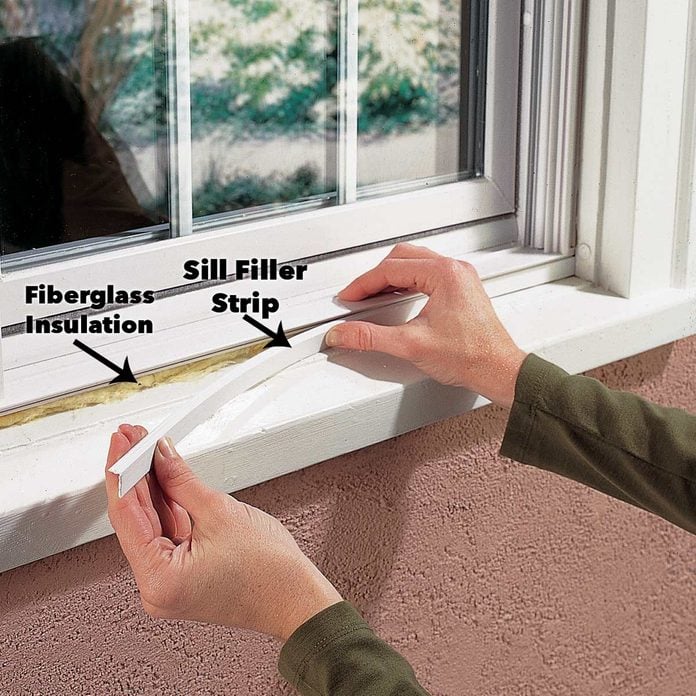
Stuff fiberglass insulation in the gap under the sill of the new vinyl window. Mensurate the size of the gap and cut the vinyl filler strip to fit. Use a sharp utility knife and straightedge or tin snips to cutting the vinyl. Press the filler into identify.
Step xv
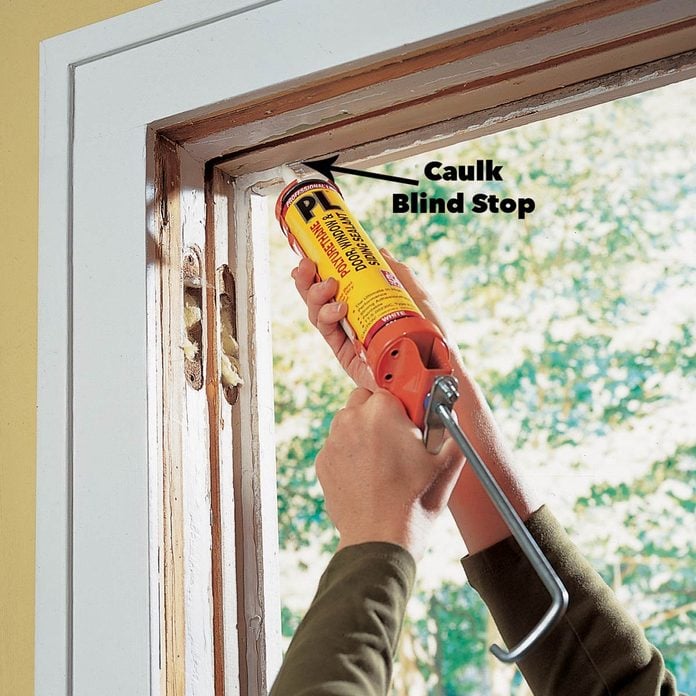
Caulk
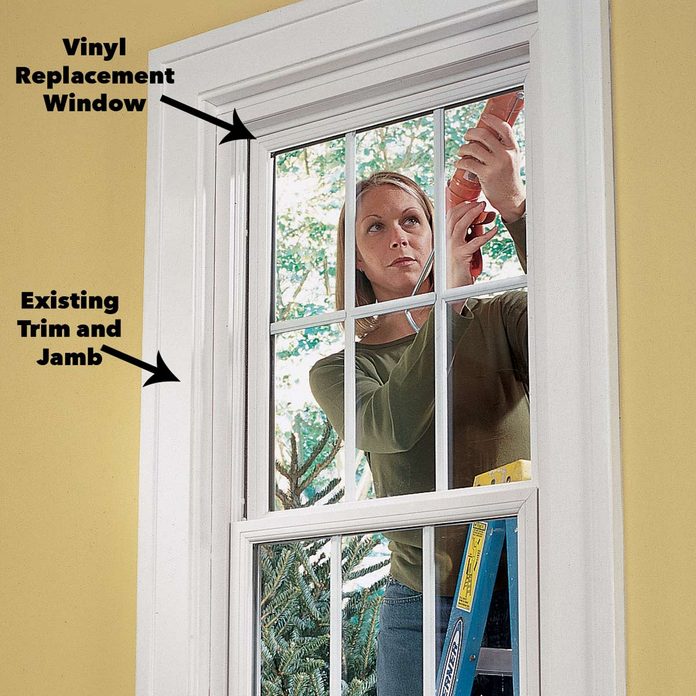
Caulk the joint between the new window and the blind cease and betwixt the windowsill and filler strip using window and door caulk.
Footstep xvi
Installing Double-Hung Sash Kits
The toughest part of sash replacement is tearing out the sometime window. You accept to pry off the end (carefully for reuse) and the departing stop (which you can discard). You tin can either nail or screw the new liner clips in place. We chose screws because driving nails can exist difficult in old window jambs.
Step 17
Determine the Bottom Angle of the Sash

Align the edge of a heavy piece of paper with the window end and fold the bottom to match the bending of the sill.
Pace 18
Effigy B: Find the Sill Angle
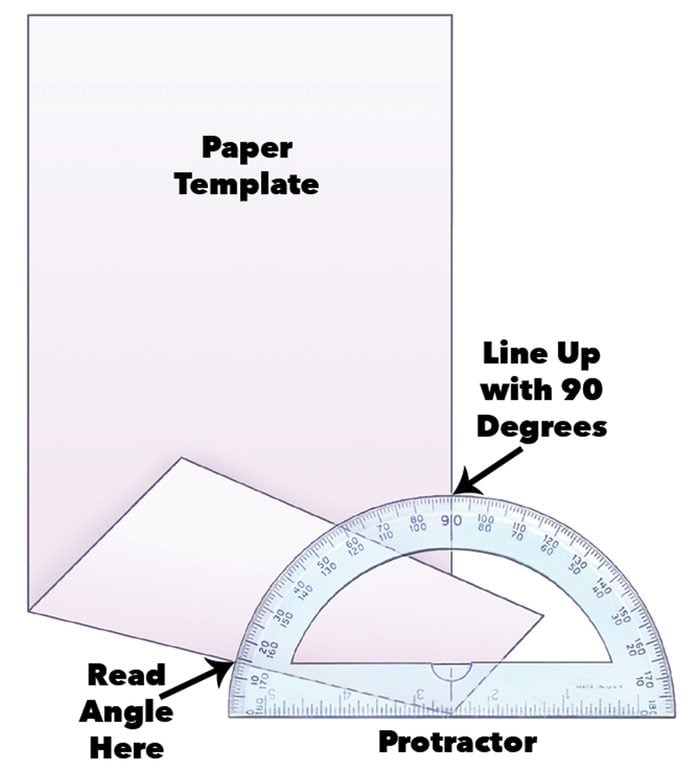
Lay a protractor on the folded paper to determine the bending. Then mensurate the interior height and width of the window frame. Use these measurements to order your sash replacement kit.
Pace 19
Remove the Lower Sash
Remove the lower sash and cut the sash cords. If your window has weatherstripping or hardware other than sash cords, pry out or unscrew these to remove the sash.
Pace 20
Remove the Parting Finish
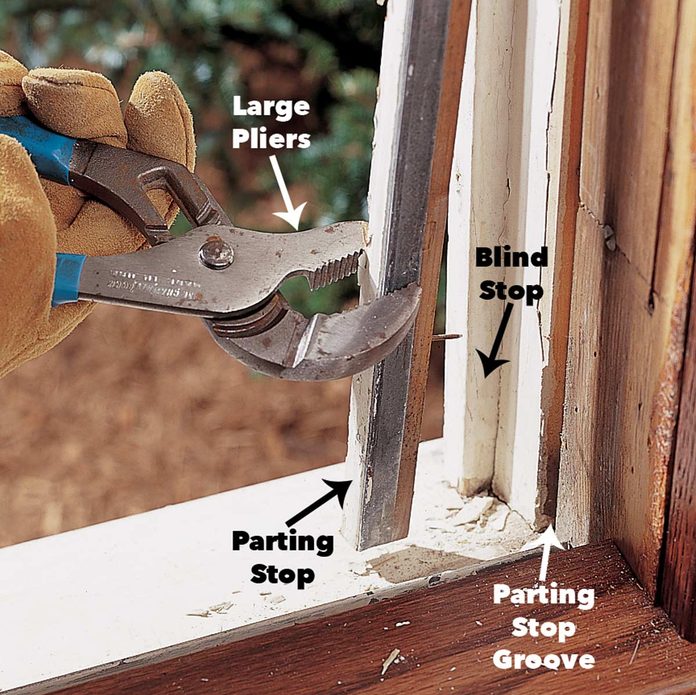
Pull or pry the parting stop from the groove in the window frame and discard it. Remove the meridian sash, cut the sash cords and take out the sash weight pulleys. Remove the sash weight embrace and weights. Stuff the crenel with fiberglass insulation.
Stride 21
Adhere Jamb Liner Clips

You tin either nail or spiral the new liner clips in place. We chose screws because driving nails tin can be difficult in erstwhile window jambs. Screw the jamb liner clips to the jamb with No. 6 x 3/4-in. pan head screws. Position clips well-nigh four in. from the top and bottom and distribute the remaining clips evenly between them. Make sure to leave a 1/16-in. infinite between the clips and the bullheaded stop to permit space for the jamb liner to slide in.
Step 22
Identify Jamb Liners

Snap jamb liners over the metallic clips after installing the sash stops and gaskets according to the instructions included with your window. Align the jamb liner so its outside border fits between the bullheaded stop and the metal clips. If your jamb liner has a vinyl flap facing the exterior, make sure it lays over the blind finish. Press firmly over each clip location until you hear or feel the liner snap onto the clips.
Stride 23
Add together Summit Departing Stop
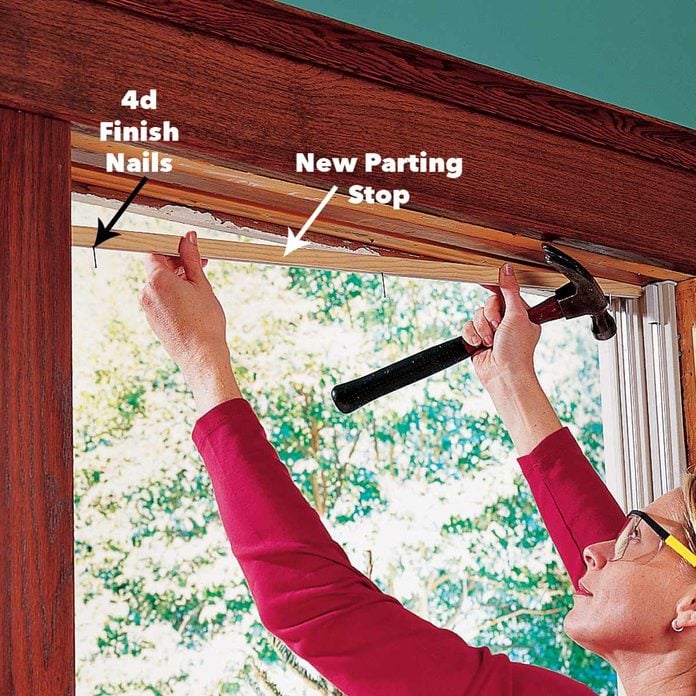
Sideslip the new parting terminate into the groove in the top jamb with the weather-stripped edge facing the exterior. Drill i/sixteen-in. pilot holes and smash the cease in place with three 4d finish nails. Replace the wood interior stops on the sides and pinnacle of the window and nail them in identify with 4d end nails.
Step 24
Position the Sash Lifts

Slide the sash lifts down to within most x in. of the windowsill. Press downwards firmly with a apartment-blade screwdriver. Twist the screwdriver slightly from horizontal to slide the lifts. And so twist back to horizontal to engage the lifts in their new locations.
Caution: Release pressure level slowly to make sure the clips are engaged earlier you remove the screwdriver completely.
Step 25
Install the Sash

Concord the top sash with the exterior facing up and the metal cams away from yous. Tilt the sash a footling and align the metallic pivots with the slots in the jamb liner closest to the exterior. Make sure the pivots are in a higher place the sash lifts. Tilt upwardly the sash and press outward on the jamb liner while you snap the peak of the sash into place betwixt the jamb liners. Slide the sash downwardly until the metallic cams contact the sash lifts. Echo the process on the lower sash. If you lot accept trouble pushing in the sash after yous tilt it up, try working with one side at a time.
How do you lot decide whether to repair or supplant your sometime windows? Check out these FAQs well-nigh ownership new windows.
Originally Published: June 25, 2019
Source: https://www.familyhandyman.com/project/how-to-install-replacement-windows/
Posted by: mcgonaglewourease.blogspot.com
0 Response to "How To Install A Window Frame"
Post a Comment